Quick start
This tutorial shows how to create basic Hello World application where one person starts “Hello, world” request, another one approves it, and when approved the request sent out.
To follow the tutorial, you need to use Python>=3.4, but since 1.0 django-viewflow works also with Python 2.7
Initial steps
Let’s create a fresh virtual environment for the demo project. In an empty directory run the following commands.
python3 -m venv env
source env/bin/activate
At first install viewflow package and django-material to enable pre-build frontend interface.
pip install django django-material django-viewflow
In the current directory, scaffold a new django project:
django-admin startproject demo .
Create an app:
./manage.py startapp helloworld
Now you should have following file structure:
demo/
├── asgi.py
├── __init__.py
├── settings.py
├── urls.py
└── wsgi.py
helloworld
├── admin.py
├── apps.py
├── __init__.py
├── migrations
│   └── __init__.py
├── models.py
├── tests.py
└── views.py
manage.py
Configuration
Open the demo/settings.py and add viewflow and demo.helloworld into INSTALLED_APPS setting
INSTALLED_APPS = [
    ...
    'viewflow',
    'helloworld',
]
Define models
Open helloworld/models.py file and define a process model with text and approved fields, to capture the process state during execution.
from django.db import models
from viewflow.models import Process


class HelloWorldProcess(Process):
    text = models.CharField(max_length=150)
    approved = models.BooleanField(default=False)
Define flow
Let’s take a look at the flow BPMN diagram. We are going to map each shape to the corresponding flow node definition.
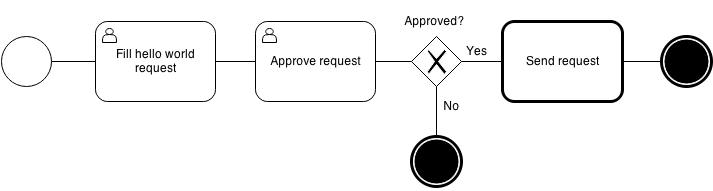
Open the demo/helloworld/flows.py file and define:
from viewflow import flow
from viewflow.base import this, Flow
from viewflow.flow.views import CreateProcessView, UpdateProcessView

from .models import HelloWorldProcess


class HelloWorldFlow(Flow):
    process_class = HelloWorldProcess

    start = (
        flow.Start(
            CreateProcessView,
            fields=["text"]
        ).Permission(
            auto_create=True
        ).Next(this.approve)
    )

    approve = (
        flow.View(
            UpdateProcessView,
            fields=["approved"]
        ).Permission(
            auto_create=True
        ).Next(this.check_approve)
    )

    check_approve = (
        flow.If(lambda activation: activation.process.approved)
        .Then(this.send)
        .Else(this.end)
    )

    send = (
        flow.Handler(
            this.send_hello_world_request
        ).Next(this.end)
    )

    end = flow.End()

    def send_hello_world_request(self, activation):
        print(activation.process.text)
Viewflow proceeds all application flows from the flows.py file.
Each flow is a Python class that subclasses viewflow.base.Flow
Each attribute represents a flow task
To connect flow tasks altogether, the special this object can be used to make forward references
flow.Start represents a task that is performed by a person in a Django view. For the tutorial purpose, we use built-in CreateProcessView. But any class or functional based view annotated with @flow.flow_start_view decorator can be used here.
flow.Task is a user task for an existing process.
Tasks execution rights could be restricted by the Django permission system. You can specify a permission name here or set auto_create=True that leads to creating special permission for the task. In our case, we will have helloworld.can_start_helloworldprocess and helloworld.can_approve_helloworldprocess permissions created. In addition, two standard permissions would be created helloworld.view_helloworldprocess and helloworld.manage_helloworldprocess for flow list and administrative actions views.
flow.If is the simple exclusive gateway. It selects an outcome depending on a callable result. For the input, callable gets a task activation - an object that handles current task processing logic, and that has an activation.process and activation.task fields initialized with the corresponding model instances.
If the request is approved, the flow.Handler will be executed. flow.Handler is the task performed by synchronous Python code call. Here a this reference could be used to point to a flow instance method, or any Python callable.
flow.End finalizes the process and marks it as completed.
Enable frontend
Here we could start to write a lot of templates for flow list, actions, task details and task execution views. Viewflow comes with pre-build frontend module, which provides ready to use UI, let’s just enable it.
First, adds the required apps to the INSTALLED_APPS
INSTALLED_APPS = [
    ...
    'material',
    'material.frontend',
    'viewflow',
    'viewflow.frontend',
    'demo.helloworld',
]
Add frontend URLs into global URL conf module at demo/urls.py
from django.urls import include, path
from django.views import generic
from material.frontend import urls as frontend_urls

urlpatterns = [
    path(r'', generic.RedirectView.as_view(url='/workflow/', permanent=False)),
    path(r'', include(frontend_urls)),
]
At the last step, register our flow in the viewflow.frontend.
from viewflow import frontend

@frontend.register
class HelloWorldFlow(Flow):
    ...
Run and explore
Create migrations for the helloworld app.
./manage.py makemigrations helloworld
Apply it
./manage.py migrate
Create an admin user to initial login
./manage.py createsuperuser
Run the server
./manage.py runserver
Go to http://127.0.0.1:8000 and see the viewflow in action!
What’s next
See also
Themes - frontend colors customization